SharePoint is a powerful tool for businesses to store and manage data. However, as data accumulates, it can become difficult to find and sort through information. That’s where filters come in. SharePoint filter queries allow users to narrow down their data to only what they need, making it easier to manage and analyze.
In this blog post, we’ll explore SharePoint filter queries in Power Automate, and how they can help streamline your business processes.
What are SharePoint filter queries?
SharePoint filter queries are a way to narrow down the data stored in SharePoint lists or libraries. Filters allow users to specify which data should be returned based on specific criteria. These criteria can include anything from dates and numbers to text strings and user names.
Filter queries in SharePoint are written in OData syntax, which is a standardized way of expressing queries across a range of data sources. This syntax can be a bit intimidating for those who are new to SharePoint, but once you get the hang of it, it can be a powerful tool for managing your data.
Using filters in Power Automate
Power Automate is a cloud-based tool that allows users to automate tasks and workflows. With Power Automate, you can easily connect SharePoint to other applications and automate tasks based on specific criteria.
To use filters in Power Automate, you’ll need to create a flow that connects to your SharePoint list or library. Once you’ve done that, you can add a “Get items” action to your flow. This action allows you to specify which items you want to retrieve from your SharePoint list or library.
To add a filter query to your “Get items” action, you’ll need to click on the “Show advanced options” link in the action’s configuration panel. From there, you can enter your filter query using the OData syntax.
Here’s an example of a filter query that retrieves all items from a SharePoint list where the “Status” column is set to “In Progress”:
Status eq 'In Progress'
In this example, “Status” is the name of the column we want to filter by, “eq” is the operator we’re using to compare values, and “In Progress” is the value we’re comparing against.
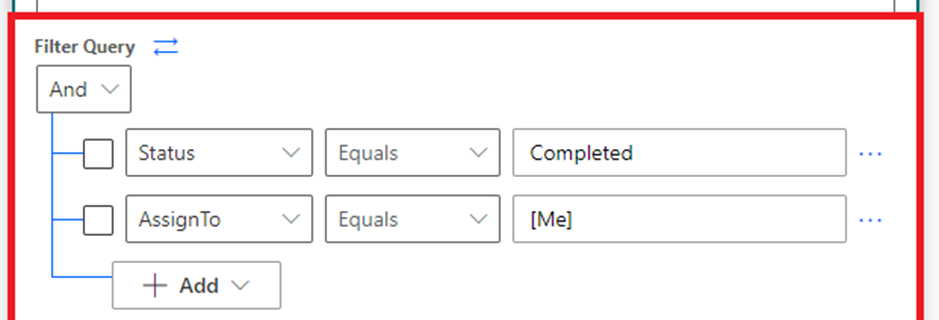
You can also use logical operators like “and” and “or” to combine multiple criteria in your filter query. Here’s an example of a filter query that retrieves all items from a SharePoint list where the “Status” column is set to “In Progress” and the “Assigned To” column is set to the current user:
Status eq 'In Progress' and AssignedTo eq '[Me]'In this example, “[Me]” is a special keyword that represents the current user.
Once you’ve added your filter query, you can save your flow and test it to make sure it’s working correctly.
Benefits of using filters in Power Automate
Using filters in Power Automate can help streamline your business processes in a number of ways. Here are a few benefits:
- Reduced workload: By automating tasks based on specific criteria, you can reduce the amount of manual work required to manage your data.
- Improved accuracy: Filters help ensure that you’re only working with the data you need, which can improve the accuracy of your analyses and reports.
- Faster decision-making: By quickly retrieving the data you need, you can make faster and more informed decisions.
- Better collaboration: By sharing specific views of your data with others, you can improve collaboration and communication within your team.
SharePoint filter queries in Power Automate are a powerful tool for managing and analyzing data. By using filters, you can narrow down your data to only what you need, making it easier to manage and analyze. If you’re new to SharePoint filter queries, it may take some time to learn but at you will get the data what you need.
Adnan, a distinguished professional, boasts an impressive track record as a Microsoft MVP, having achieved this prestigious recognition for the eighth consecutive year since 2015. With an extensive career spanning over 18 years, Adnan has honed his expertise in various domains, notably excelling in SharePoint, Microsoft 365, Microsoft Teams, the .Net Platform, and Microsoft BI. Presently, he holds the esteemed position of Senior Microsoft Consultant at Olive + Goose.Notably, Adnan served as the MCT Regional Lead for the Pakistan Chapter from 2012 to 2017, showcasing his leadership and commitment to fostering growth within the tech community. His journey in the realm of SharePoint spans 14 years, during which he has undertaken diverse projects involving both intranet and internet solutions for both private and government sectors. His impact has transcended geographical boundaries, leaving a mark on projects in the United States and the Gulf region, often collaborating with Fortune 500 companies.Beyond his roles, Adnan is a dedicated educator, sharing his insights and knowledge as a trainer. He also passionately advocates for technology, frequently engaging with the community through speaking engagements in various forums. His multifaceted contributions exemplify his dedication to the tech field and his role in driving its evolution.


No Comments