
In the previous post, we built a helpdesk agent in Copilot Studio that collects support details and submits a ticket to a SharePoint issue tracker list using Power Automate. That works, but the default question-by-question chat experience can feel slow when the user needs to provide several details.
Adaptive Cards make the experience cleaner. Instead of asking for category, priority, description, and contact details one message at a time, the agent can show a structured form inside the conversation. The same card approach can also display a ticket summary after the SharePoint item is created.
Why use Adaptive Cards in a helpdesk agent?
Adaptive Cards are useful when a custom agent needs structured input. In Copilot Studio, an Adaptive Card node can show a card with form fields and submit buttons, then store the user’s response in variables for later use in the conversation.
For a helpdesk agent, this is ideal for:
- Collecting ticket details in one screen
- Reducing back-and-forth questions
- Using dropdowns for category and priority
- Confirming the ticket before submission
- Displaying the final ticket ID after Power Automate creates the SharePoint item
The pattern is simple: use an input Adaptive Card to collect the ticket, send the values to Power Automate, create the SharePoint list item, and then show a confirmation card.
Where Adaptive Cards fit in the helpdesk flow
| Stage | What the agent does | Best card type |
|---|---|---|
| Ticket intake | Collects issue title, description, category, priority, name, and email | Interactive Adaptive Card |
| Review before submit | Shows the captured ticket details for confirmation | Interactive Adaptive Card |
| Ticket created | Displays ticket ID, status, and next steps | Message card or non-interactive card |
Microsoft recommends using the Adaptive Card node for interactive cards where the user is expected to submit a response, while Message and Question nodes can be used to display non-interactive cards.
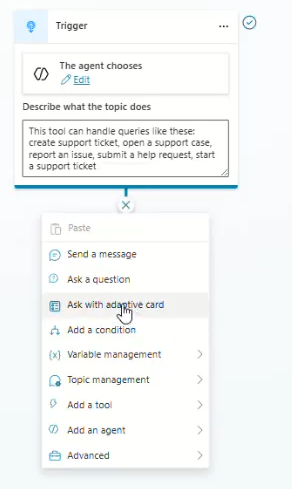
Step one: Create the ticket input card
In Copilot Studio, open the topic that handles ticket creation. Add a node after the greeting or intent confirmation, then select Ask with Adaptive Card. Microsoft’s process is to add the node, open the node properties, select Edit adaptive card, design the card or paste JSON into the card payload editor, then save the card .
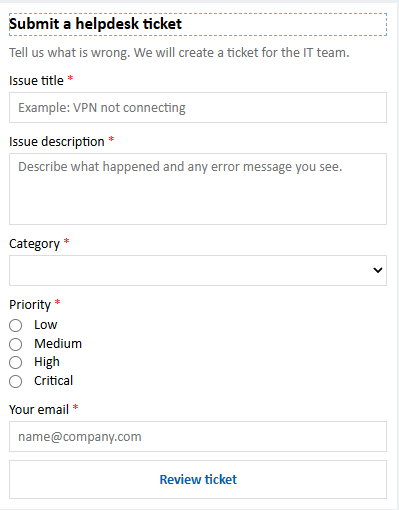
For a helpdesk ticket, keep the first card short. A good input card should collect only what the SharePoint issue tracker needs.
Suggested fields:
| Field | Adaptive Card input | SharePoint column |
|---|---|---|
| Issue title | Input.Text | Title |
| Description | Input.Text multiline | Description |
| Category | Input.ChoiceSet | Category |
| Priority | Input.ChoiceSet | Priority |
| Requester email | Input.Text |
Here is a simple Adaptive Card JSON example:
{
  "$schema": "http://adaptivecards.io/schemas/adaptive-card.json",
  "type": "AdaptiveCard",
  "version": "1.5",
  "body": [
    {
      "type": "TextBlock",
      "text": "Submit a helpdesk ticket",
      "weight": "Bolder",
      "size": "Medium",
      "wrap": true
    },
    {
      "type": "TextBlock",
      "text": "Tell us what is wrong. We will create a ticket for the IT team.",
      "wrap": true,
      "isSubtle": true
    },
    {
      "type": "Input.Text",
      "id": "ticketTitle",
      "label": "Issue title",
      "placeholder": "Example: VPN not connecting",
      "isRequired": true,
      "errorMessage": "Please enter a short issue title."
    },
    {
      "type": "Input.Text",
      "id": "ticketDescription",
      "label": "Issue description",
      "placeholder": "Describe what happened and any error message you see.",
      "isMultiline": true,
      "isRequired": true,
      "errorMessage": "Please describe the issue."
    },
    {
      "type": "Input.ChoiceSet",
      "id": "ticketCategory",
      "label": "Category",
      "style": "compact",
      "isRequired": true,
      "errorMessage": "Please choose a category.",
      "choices": [
        { "title": "Hardware", "value": "Hardware" },
        { "title": "Software", "value": "Software" },
        { "title": "Access", "value": "Access" },
        { "title": "Network", "value": "Network" },
        { "title": "Other", "value": "Other" }
      ]
    },
    {
      "type": "Input.ChoiceSet",
      "id": "ticketPriority",
      "label": "Priority",
      "style": "expanded",
      "isRequired": true,
      "errorMessage": "Please choose a priority.",
      "choices": [
        { "title": "Low", "value": "Low" },
        { "title": "Medium", "value": "Medium" },
        { "title": "High", "value": "High" },
        { "title": "Critical", "value": "Critical" }
      ]
    },
    {
      "type": "Input.Text",
      "id": "requesterEmail",
      "label": "Your email",
      "placeholder": "name@company.com",
      "isRequired": true,
      "errorMessage": "Please enter your email address."
    }
  ],
  "actions": [
    {
      "type": "Action.Submit",
      "title": "Review ticket",
      "data": {
        "actionSubmitId": "helpdesk_ticket_input"
      }
    }
  ]
}
Copilot Studio supports Adaptive Cards schema versions 1.6 and earlier, but the supported version depends on the host app, and Microsoft lists Teams as limited to version 1.5. For a helpdesk agent that may run in Teams, version 1.5 is a safe choice. You can also verify Adaptive Cards schema from https://adaptivecards.microsoft.com/designer .
Step two: Map card outputs to agent variables
After the user selects Review ticket, Copilot Studio creates output variables based on the card inputs. If the variables are not generated correctly, Microsoft says you can manually update the list of variables and their types with Edit Schema in the Adaptive Card node properties .
Map the card fields like this:
| Card input ID | Agent variable | Power Automate input |
|---|---|---|
ticketTitle | Topic.TicketTitle | Title |
ticketDescription | Topic.TicketDescription | Description |
ticketCategory | Topic.TicketCategory | Category |
ticketPriority | Topic.TicketPriority | Priority |
requesterEmail | Topic.RequesterEmail | Email |
Adaptive Cards use input IDs to identify collected values when the submit action runs, and Input.ChoiceSet also uses its id as the unique identifier for the submitted value (Microsoft Learn). Action.Submit gathers the card’s input fields, merges them with optional hidden data, and sends that event back to the client for processing (Adaptive Cards).
Step three: Add a review card before creating the ticket
Do not create the SharePoint item immediately after the first card. Show a short review card and ask the user to confirm.
This prevents bad tickets like:
- “Laptop broken” with no description
- Wrong priority
- Wrong category
- Mistyped email
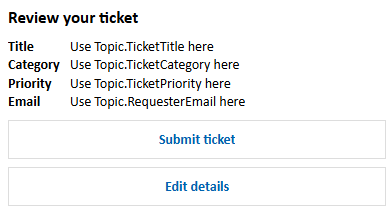
The review card can show the captured values and offer two buttons: Submit ticket and Edit details. In Copilot Studio, you can make cards dynamic by switching the Adaptive Card node to Formula mode and referencing topic or agent variables with Power Fx.
Example review card structure:
{
  "$schema": "http://adaptivecards.io/schemas/adaptive-card.json",
  "type": "AdaptiveCard",
  "version": "1.5",
  "body": [
    {
      "type": "TextBlock",
      "text": "Review your ticket",
      "weight": "Bolder",
      "size": "Medium",
      "wrap": true
    },
    {
      "type": "FactSet",
      "facts": [
        { "title": "Title", "value": "Use Topic.TicketTitle here" },
        { "title": "Category", "value": "Use Topic.TicketCategory here" },
        { "title": "Priority", "value": "Use Topic.TicketPriority here" },
        { "title": "Email", "value": "Use Topic.RequesterEmail here" }
      ]
    }
  ],
  "actions": [
    {
      "type": "Action.Submit",
      "title": "Submit ticket",
      "data": {
        "actionSubmitId": "helpdesk_ticket_confirm"
      }
    },
    {
      "type": "Action.Submit",
      "title": "Edit details",
      "data": {
        "actionSubmitId": "helpdesk_ticket_edit"
      }
    }
  ]
}
Use unique actionSubmitId values for submit buttons. Microsoft recommends unique identifiers or data payloads for Adaptive Card submit actions so the agent can tell which button the user selected.
Step four: Submit the ticket to SharePoint
When the user selects Submit ticket, call the same Power Automate flow from the previous blog post. The flow should create an item in the SharePoint issue tracker list.
Map the confirmed values to the SharePoint Create item action:
| Power Automate input | SharePoint issue tracker column |
|---|---|
Title | Title |
Description | Description |
Category | Category |
Priority | Priority |
Email | |
Status | New |
Return the SharePoint item ID or ticket number to Copilot Studio. This allows the agent to show a clean confirmation card instead of a plain text message.
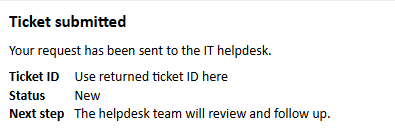
Step five: Display a ticket confirmation card
After the flow returns the ticket ID, show the user a simple confirmation card. This card does not need input fields, so it can be displayed as a message-style card instead of another interactive form.
Example:
{
  "$schema": "http://adaptivecards.io/schemas/adaptive-card.json",
  "type": "AdaptiveCard",
  "version": "1.5",
  "body": [
    {
      "type": "TextBlock",
      "text": "Ticket submitted",
      "weight": "Bolder",
      "size": "Medium",
      "wrap": true
    },
    {
      "type": "TextBlock",
      "text": "Your request has been sent to the IT helpdesk.",
      "wrap": true
    },
    {
      "type": "FactSet",
      "facts": [
        { "title": "Ticket ID", "value": "Use returned ticket ID here" },
        { "title": "Status", "value": "New" },
        { "title": "Next step", "value": "The helpdesk team will review and follow up." }
      ]
    }
  ]
}
This confirmation card gives users confidence that the ticket was created. It also reduces duplicate submissions because users have a clear reference number.
Best practices for helpdesk Adaptive Cards
- Keep the first card short: Ask only for the fields needed to create the SharePoint item.
- Use labels, not only placeholders: Microsoft recommends using the
labelproperty because screen readers announce it when users focus on an input. - Add required-field validation: Use
isRequiredanderrorMessageso users know what to fix before submitting. - Use dropdowns for category and priority:
Input.ChoiceSetsupports compact, expanded, and filtered styles, plus single-select or multi-select choices (Microsoft Learn). - Confirm before creating the SharePoint item: A review card prevents bad data from entering the issue tracker.
- Use unique submit identifiers: Differentiate buttons like submit, edit, cancel, and escalate with unique
datavalues. - Test in the real channel: Teams and web chat can render cards differently, so test the final agent where users will actually open it.
Adaptive Cards make a Copilot Studio helpdesk agent feel more like a real support form and less like a long chat script. Use one card to collect ticket details, one card to confirm the request, and one card to display the SharePoint ticket ID after Power Automate creates the item.
If the previous blog post gave you the working helpdesk agent, this step makes it easier for employees to use. The result is cleaner input, fewer incomplete tickets, and a more professional support experience inside your custom agent.
adaptive cards
copilot studio
Custom Agents
Helpdesk
Microsoft 365
Microsoft Copilot
SharePoint Online
Adnan, a distinguished professional, boasts an impressive track record as a Microsoft MVP, having achieved this prestigious recognition for the eighth consecutive year since 2015. With an extensive career spanning over 18 years, Adnan has honed his expertise in various domains, notably excelling in SharePoint, Microsoft 365, Microsoft Teams, the .Net Platform, and Microsoft BI. Presently, he holds the esteemed position of Senior Microsoft Consultant at Olive + Goose.Notably, Adnan served as the MCT Regional Lead for the Pakistan Chapter from 2012 to 2017, showcasing his leadership and commitment to fostering growth within the tech community. His journey in the realm of SharePoint spans 14 years, during which he has undertaken diverse projects involving both intranet and internet solutions for both private and government sectors. His impact has transcended geographical boundaries, leaving a mark on projects in the United States and the Gulf region, often collaborating with Fortune 500 companies.Beyond his roles, Adnan is a dedicated educator, sharing his insights and knowledge as a trainer. He also passionately advocates for technology, frequently engaging with the community through speaking engagements in various forums. His multifaceted contributions exemplify his dedication to the tech field and his role in driving its evolution.


No Comments