Adding a column to a SharePoint list is pretty simple job, you need Edit permission on the list to update the list column index and also item count in list must be less than 20000 as you can not add a field to list index if item count is over 20K.
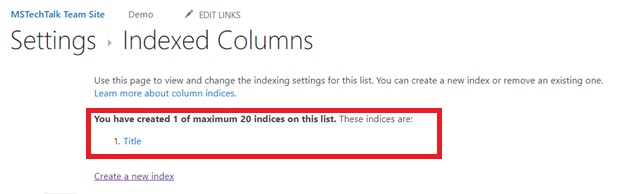
You can add upto 20 index columns in list. For adding a index column using interface you have to go to list settings and click on Indexed columns, it will take you to the indexed column page.

Click on Create a new index link and select the column shown in drop down. You can have index column by selecting the dropdown link. You can see few of the column from your list/library are not showing in the list because there are few column types which are supported, and few are not supported. Check this link for details on supported column types.
Adding Index column using PowerShell
I have created a simple PowerShell script which can be used to add/remove list, you can download the script from TechNet.
In below CSOM script written in PowerShell, you can see that after loading the list, I am getting the Documents and then fetching the Title field and then updating the field index value to true.
$list = $ctx.Web.Lists.GetByTitle(“Documents”)
$field = $list.Fields.GetByTitle(“Title”)

$field.Indexed = $true
$field.Update()
$ctx.ExecuteQuery()
In above screenshot, you can see the title field created using powershell script. yo
adding a column to list index using powershell and ui
CSOM
List index column
Office 365
PowerShell
SharePoint
SharePoint 2013
SharePoint 2016
SharePoint Online
Adnan, a distinguished professional, boasts an impressive track record as a Microsoft MVP, having achieved this prestigious recognition for the eighth consecutive year since 2015. With an extensive career spanning over 18 years, Adnan has honed his expertise in various domains, notably excelling in SharePoint, Microsoft 365, Microsoft Teams, the .Net Platform, and Microsoft BI. Presently, he holds the esteemed position of Senior Microsoft Consultant at Olive + Goose.Notably, Adnan served as the MCT Regional Lead for the Pakistan Chapter from 2012 to 2017, showcasing his leadership and commitment to fostering growth within the tech community. His journey in the realm of SharePoint spans 14 years, during which he has undertaken diverse projects involving both intranet and internet solutions for both private and government sectors. His impact has transcended geographical boundaries, leaving a mark on projects in the United States and the Gulf region, often collaborating with Fortune 500 companies.Beyond his roles, Adnan is a dedicated educator, sharing his insights and knowledge as a trainer. He also passionately advocates for technology, frequently engaging with the community through speaking engagements in various forums. His multifaceted contributions exemplify his dedication to the tech field and his role in driving its evolution.


No Comments